

“There is a crack in the middle of the deck!” Heidi told me as she returned from doing something at the front of the boat. Not a good thing to hear at any time.
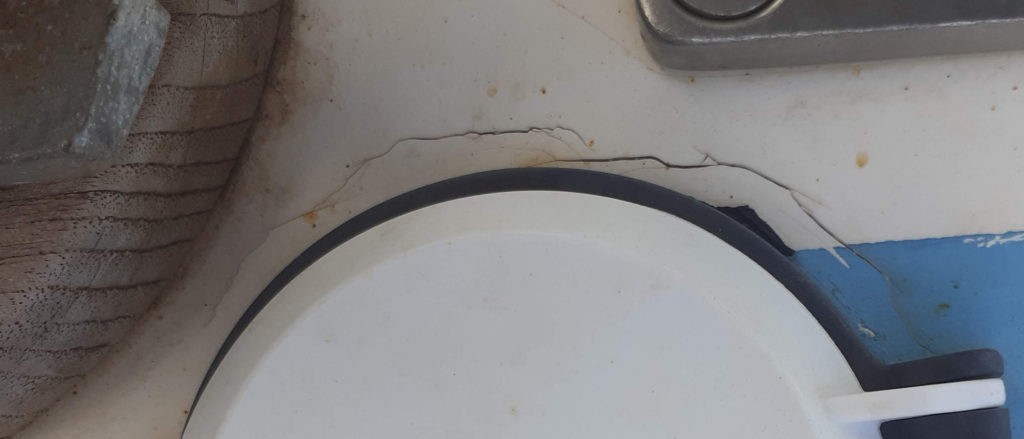
We took a long hard look at the crack and decided it could only be something to do with the foot-switch next to it or that the inner foresail was trying to rip its mounting out of the deck which is definitely not something that should happen. We contacted Colin, our favourite surveyor (http://cbmarineservices.co.uk/), and he confirmed that it looked like the deck was giving under the load being applied by the inner foresail. He suggested that the plate under the deck be tied down to the hull or, if that was not possible then, a laminated beam should be added below the deck to spread the weight. Option one was impossible due to lack of space so option two it was.
We are anchored off Huahine, a beautiful tropical island with no boat maintenance firms, no marine shops and little in the way of tradesmen. If they need a house they have a kit shipped from Tahiti and it is assembled here. There is one hardware store, the owner of whom was asking how the project was going by the time we finished.
So we made a plan:
- design and build a beam that follows the curve of the deck
- epoxy the beam so that it is waterproof and paint it white so it looks good
- get the foresail down and packed away
- dismantle the inner forestay including the furling system and secure it against high winds
- Remove the existing steel plates from above and below deck
- repair the crack with resin
- install the new beam
- reinstall and seal the plates, assemble the forestay and the furling system.
Luckily we knew how to do number 2 & 3 so they should have been easy. It would have been easy if the bolt at the base of the sail wasn’t seized and the allen key hadn’t of broken off trying to remove the offending bolt.

Everything else was learning by doing. We visited the hardware store and found 9mm wood from which we made three “layers” that we then installed above each other to allow them to bend to the correct shape before being screwed together. Heidi is an epoxy and paint expert so the beam was soon waterproof and looking good.
Getting the foresail down and everything dismantled was impossible in high winds and with gusts of 30 knots. But we have time so we worked on other projects and waited a week for the wind to drop. It turned out easier than expected.
Heidi watched a video about crack repair, bought some resin and mended the crack. Unfortunately there was only see through resin on the island but the repair is perfect and will keep the moisture out. When we reach civilization we can worry about color.
We then installed our new beam and, after then waited for the wind to drop again. This morning I opened my eyes and heard “Hey! There is no wind. Come on, let’s do it.” Two hours later everything was reassembled and ready to be tested.
Well done both of you. Heidi is the real handworker these days.
May be helpful to anyone else considering this. I fitted an “eye nut” to one of the bolts through the stem fitting tab which runs down the bow. Then a backing plate for the deck fitting, then finally a rigging screw between the eye and the backing plate. Bombproof!
That sounds like a great idea. Does it get in the way of the chain? Do you have a photograph?
Thanks